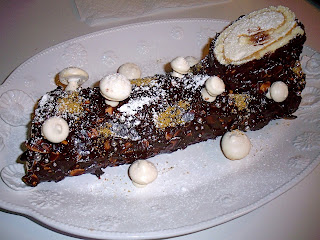
Last post I showed you how to create some decorations for the Buche de Noel and now I will tell you how to make the actual cake and how to assemble it into a masterpiece of buttercream and bark. The recipe is quite long, but not too hard, so no mindless banter this time around, lets get straight to the good stuff!
However, let me preface the recipe with a tip. When making a recipe with so many steps it is helpful and way less stressful to measure out your ingredients for each step before you actually beginning making that element. Here are my ingredients for the cake all ready to go.

Let's start with the cake!
Basic Chiffon Cake (for Buche De Noel)
adapted from Tartine
Ingredients: Given in standard baking measures and ounces (which is more accurate)
1 C + 2tbsp or 5 1/2 oz All-purpose flour
1/4 C or 5 1/4 oz Sugar
1 tsp Backing Powder
1/2 tsp Salt
1/4 C or 2 oz Vegetable Oil
3 Large Egg Yolks
1/3 C + 1 tbsp or 3 oz Water
1 tsp Vanilla Extract
3/4 tsp Lemon Zest
5 Egg Whites, at room temp
1/4 tsp Cream of Tartar
Directions:
1. Preheat oven to 325, line the bottom of a 12x17 jelly roll pan with parchment paper to fit exactly, do not grease the sides of the pan.
2. Sift the flour and baking powder together into a large mixing bowl. Mix in all but 3 tbsp of the sugar and all of the salt into the flour mixture.
3. In a small bowl whisk the oil, egg yolks (save the the leftover whites for later), water, vanilla and lemon zest together.
* See pic below for an easy way to seperate egg yolks with you hand.

4. Make a well in the flour mixture and pour the egg mixture into it, whisk quickly for 1 min, set aside.

5. Pour the egg whites (remember you already have 3 set aside so you only need to add 2 more) into a stand mixer bowl, or large mixing bowl. Using the whisk attachment, or a hand mixer, beat on med-high speed until frothy. Add the cream of tartar and beat at the same speed until the whites hold soft peaks.
6. Slowly add the 3 tbsp of sugar you reserved and beat at the same speed until whites hold stiff shiny peaks.
7. Gently fold in about 1/3 of the whites into the yolk mixture to lighten. Then gently fold in the rest of the whites.
8. Pour the batter into the prepared pan and smooth with a spatula. Bake 15-25 min or until cake is set to the touch, ie it springs back and is not gooey when a toothpick is inserted. Set aside to cool in the pan. Once cool run a small knife along the edge to loosen, then invert the cake onto a cooling rack, peel off the parchment and set aside.

Next for the buttercream, you still following??
Swiss Coffee Buttercream
adapted from Tartine
Ingredients:
1 1/4 C or 10 oz Unsalted Butter, at room temp
1 C + 2 tbsp or 8 oz Sugar
1/2 C or 4 oz Egg Whites
1/4 tsp Salt
1/4 C or 2 oz Coffee, brewed double strength
Directions:
1. Cut the butter into tbsp increments.
2. Fill a sauce pan with about 2 inches of water and bring to a simmer.
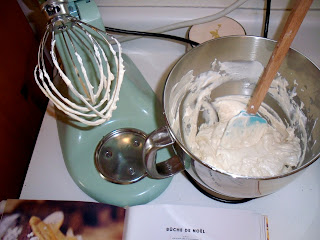
3. Combine sugar, egg whites and salt in a stainless steal bowl of a stand mixer. Whisk together to combine. Place the bowl over the simmering water, making sure that the bottom of the bowl does not touch the simmering water. Whisk over the water until the mixture reaches 120 degrees or is hot to the touch, about 3-5 min.
4. Remove the bowl from the heat and place in the bowl into the stand mixer with the whisk attachment in place. Mix on high speed until the the mixture is thick, glossy and holds very stiff peaks, about 5-7 min. Note! Make sure the mixture is cool before moving on to the next step or your buttercream will be soupy, which is redeemable but best to avoid.
5. Reduce the speed to med-high and add the butter to the mixture 1 tbsp at a time, making sure each addition is fully incorporated before adding the next. Mix in the coffee at a low speed, than increase to med to fully incorporate, set aside. Note! If your buttercream is soupy and not buttercream like, prepare an ice bath and immerse the bowl, without getting water inside, until it firms up.

Don't worry, it gets easier from here.
Coffee Syrup
adapted from Tartine
Ingredients:
1/2 C or 4 oz Coffee, brewed double strength
1/3 C or 2 1/2 oz Sugar
Directions:
1. In a small sauce pan, combine the coffee and sugar and bring to a simmer, stirring to disolve the sugar. Remove from the heat and let it cool, the fridge will speed up this process.

While the coffee syrup is cooling lets make the pistachio moss.
Pistachio Moss:
adapted from Tartine
Ingredients:
1/4 C or 1 1/4 oz Pistachio, shells taken off (Trader Joes sells them pre-shelled!)
Directions:
1. In a blender or food processor process the pistachios into a powder.

Once the coffee syrup is fully cooled, begin the first phase of assembly.
Directions:
1. Place the cooled cake on plastic wrap.
2. Using a pastry brush, moisten the entire cake with the cooled coffee syrup.

3. Transfer all the buttercream to the cake and spread evenly with a spatula leaving a 1 inch strip on each long side of the cake void of buttercream.

4. Starting from the longest side nearest you, begin rolling the cake tightly, using the plastic wrap to help you. Don't worry about the state of the ends, they will both be cut off anyways. Refrigerate the rolled cake for 2 hours.

After an hour and a half of fridge time for the cake begin making almond ganache bark, this will be what covers the outside of the cake and also gives it it's wood like appearance.
Almond Ganache Bark
adapted from Tartine
Ingredients:
1 C or 3 1/2 oz Sliced Almonds
6 oz Bittersweet Chocolate, chopped
3/4 C or 6 oz Heavy Cream
Directions:
1. Preheat oven to 350. Spread the almonds out on a baking sheet and bake for 5 min or until toasted. Stir halfway through to ensure even toasting. Transfer to a small plate to cool.
2. Place the chopped chocolate in a small heatproof bowl.
3. In a small saucepan bring the heavy cream to just under a boil. Pour the cream over the chocolate and let sit for 1 min, then stir the mixture until it is melted, smooth and shiny.
4. Add the cooled almonds and mix gently. Place the mixture in the fridge for 15 min or until it has thickened and is a good spreading consistency.

On to the final touches!
Assembly Directions part 2:
1. Using a sharp knife, cut a thick slice off each end at the diagonal (make sure the diagonals run parallel to each other). Set the cleanest best looking end aside. (The other end you can eat later with any leftover ganache to make sure it's good!)

2. To frost the cake, use a frosting spatula and spread the ganache bark evenly over the cake leaving the faces of the two ends exposed. Make sure you reserve enough ganache to frost the "bough" which is your reserved end piece.
3. Place the diagonal slice, the "bough, on top of the frosted cake towards one of the cakes ends. Make sure the diagonal end is facing up. Next frost the sides of the bough leaving the top face exposed.
4. Transfer the cake to your serving dish. I recommend buying a cake transfer tool, they are so handy!
Now it's time to decorate!
1. Take out those mushrooms you made days before. Whittle little holes in the bottom of the mushroom caps big enough for the stems to fit in. Put a little ganache in the hole and attach the stem. Then place the mushrooms on your cake going every which way. You can even put some on your platter around the cake.
2. Next sprinkle patches of powder sugar on the cake to look like snow patches they have collected on a log.
3. Than sprinkle the moss on the cake in patches to look like patches of moss growing on the log.
4. Next use large and medium sized silver dragees, which are hard candies that look like metal (pictured below), to create dew drops on the cake.

5. Attach any other decorations you have made for the cake at this time. I did not put my gnome or leaves on from my earlier post because they looked to kitschy and my cake came out more organic looking. Basically, they clashed. Do you see the sad looks on their faces?

And finally breathe in deep and take in the beautiful piece of art you have just created! Did I already mention it is delicious too?


Will you attempt to make a Buche De Noel this Christmas season? Please do! It's really not too hard, just a time commitment. But it is a time commitment that is sure to impress friends, family and loved ones. And impressing people is what Christmas is all about right? To quote Wayne Campbell, "Not!" It's about something totally different, it's about celebrating the birth of the Savior of the world. That's right He came to rescue us from ourselves and make us new here and now continuing into eternity. If you try anything this Holiday season, try Jesus on first.... then try the cake :)


That looks incredible! It is so hard to read all your posts because my husband is diabetic...so I can't really make this stuff (but I can dream lol)
ReplyDeleteMaybe I'll try this one though, it seems wonderful!
I will have to do a special post soon for you and him then. I have a recipe for a suagr free cupcake in one of my recipe books :)
ReplyDelete