Showing posts with label nuts. Show all posts

Monday, December 5, 2011

Spice Up Yo' Holidays!


With these two recipes!
Spice Power!

Rosemary, Honey & Black Pepper Pecans
Recipe: Sweet Paul
Make sure to add more pepper than it calls for. Much tastier!


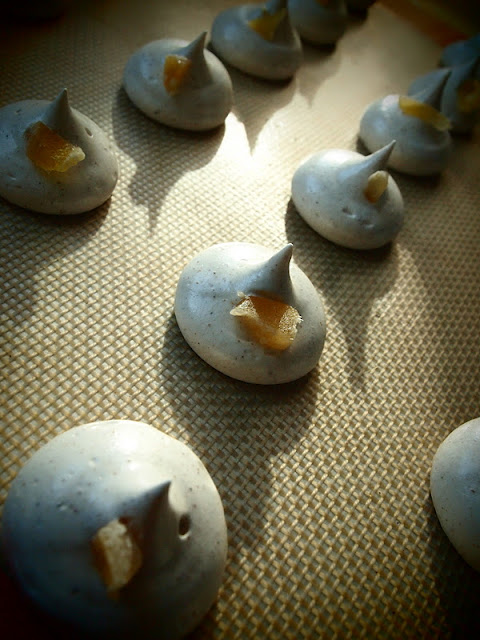
Gingerbread Meringues
For the gluten-free/dairy-free family member or guest you are bound to have.


Monday, November 22, 2010

Have An In Vogue Thanksgiving: Maple Bourbon Pecan Pie With Kumquats


Food trends, do you buy into them or pridefully deny that you care? Or are you just oblivious that food has become as trendy as a NYC Fashion Week runway? My stance is, if it tastes good, I am for it! Which is the case for this Maple Bourbon Pecan Pie with Kumquats.


Gang, this might be the most stylish dessert out there on Turkey Day. Let me break it down. Maple, so in, bourbon, hip as can be, pie, dare I say vintage?, and possibly the trendiest part of this dessert... kumquats. That right, those tiny little oval orange things; they are just coming into season both agriculturally and fashionably within the pastry world.


All trends aside, this pie is great! I have always been a fan of pecan pie, and probably will always think my mom's is the best, so of course I love this one. But I have news for you so-called "Pecan Pie Haters" whose main gripe is that pecan pie is too dang sweet! By using half corn syrup/half maple syrup, adding a little alcohol and with the addition of the super tart kumquats this pie has a much milder sophisticated taste that is oh-so-great!


So throw on your best chambray shirt, a sequined maxi, and possibly some heels with socks and show up to your hosts house with this pie, because, like Tim Gunn says, if you can "make it work" trends are a great idea :)


Maple Bourbon Pecan Pie With Kumquats
*adapted from Tartine
*makes one 9-inch pie

Pie Crust Ingredients
  • 1/2 tsp salt
  • 1/3 cup very cold water
  • 8 oz (2.5 cups + 1 tbsp) flour
  • 1/2 cup + 2.5 tbsp very cold butter
Filling Ingredients
  • 5.25 oz (3/4 cup) sugar
  • 1/2 cup maple syrup
  • 1/2 cup light corn syrup
  • 2 tbsp bourbon
  • 1/2 tsp salt
  • 1/4 cup unsalted butter
  • 1 tsp vanilla extract
  • 3 large eggs, lightly beaten
  • 10 oz (2 cups) pecan halves
  • 2 oz (1/2  cup) kumquats, thinly sliced (skins on)
Pie Crust Directions

1. In a cup, combine the cold water and salt; mix until dissolved and store in the freezer until you are ready to use it.

2. Put the flour into a food processor, cut the butter in 1-inch chunks and place on top of the flour. Pulse briefly until large crumbs form. Add the water mixture and pulse until the dough begins to come together into a ball but is not completely smooth. You should see some butter chunks.

3. On a lightly floured surface, form the dough into a disk 1-inch thick. Refrigerate for at least 2 hours to overnight.

4. Roll out your disk 1.5 inches bigger than your pie dish, a 9.5inch pie dish is ideal to use. Transfer the dough to your pie dish, pressing it gently into place. Crimp the edges. Refrigerate the pie crust for an hour before filling. They can also be frozen for up to 2 weeks well wrapped.

5. Preheat your oven to 375.

6. Line the bottom of the crust with parchment paper and fill the bottom with dried beans or pie weights. Bake for 25 minutes, then remove the beans and parchment paper and let it bake for 5-10 minute more, or until the crust is golden brown. Set aside to cool, let the crust cool completely before filling. Alternatively, you can refrigerate the crust up to a week before filling.

Pie Filling Directions

1. Preheat the oven to 350.

2. In a medium saucepan, combine the sugar, maple syrup, corn syrup, bourbon and salt and bring to a rolling boil over medium heat. Let it boil for 1 minute. Take the pan off the heat and add the butter, whisk until combined. Set aside and let the mixture cool to room temp.

3. Add the vanilla and eggs to the cooled mixture and whisk lightly until combined.  Stir in the pecans and kumquats. Pour into the pie shell and bake 50-60 minutes, until the filling is just set. If you have a pie crust protector, use it, you can also use tin foil if the pie browns to quickly. The pie keeps in the refrigerator for up to a week. Please enjoy the pie by itself, warmed with some vanilla ice cream or with hard sauce.

Sunday, June 27, 2010

Smooth Sailing to a Rocky Road: Rocky Road Ice Cream


Have you ever wondered why Rocky Road Ice Cream is called Rocky Road? Well according to the trustworthy Wikipedia, it received it's name after the Wall Street Crash of 1929. William Dreyer wanted to "give folks something to smile about in the midst of the Great Depression." I think Mr. Dreyer was on to something, because I know chocolate ice cream is my go-to when I am feeling depressed.


However, making my own ice cream often ushered me into my own mini "Great Depression" because I never could get it quite right. It was either to hard, not creamy enough or, more often than not, the problem was that it was grainy! I finally figured out it was because I was accidentally cooking the eggs in the custard stage, which then turned into thousands of tiny little scrambled egg pieces in my ice cream, yuck! 


But not this time around! This time I declared my own World War II on ice cream and pulled myself out of depression and sailed smoothly (literally) into fantastic Rocky Road Ice Cream. All I had to do was stop using my unreliable cooking thermometer to check the custards temperature and just trust my gut to tell me when it's ready. It hurt me to do so because I am a very precise numbers oriented person, but desperate times called for desperate measures and sometimes desperate measures pay off :)

I highly recommended this recipe and so does my dad who ate about a pint of it on Father's Day. I apologize for the lack of photos, when I went to take a picture of a perfect little scoop, it was all gone!

Rocky Road Ice Cream
 * adapted from David Lebovitz Perfect Scoop
Ingredients 
  • 2 cups heavy cream
  • 3 tablespoons unsweetened cocoa powder
  • 5  ounces bittersweet chocolate chopped
  • 1 cup whole milk
  • 3/4 cup sugar
  • pinch of salt
  • 5 large egg yolks
  • 1/2 teaspoon vanilla 
  • 1 1/2 cups mini marshmallows
  • 1 cup salted roasted peanuts, or nut of choice

Directions 
1. Prepare an ice bath in your sink. Warm 1 cup of the heavy cream in a med. saucepan with the cocoa powder, whisking to dissolve the cocoa powder completely. Bring it to a boil, then immediately reduce the heat and simmer for 30 seconds, whisking constantly. Remove it from the heat and add the copped chocolate, stir until smooth, then stir in the remaining 1 cup of cream. Scrape the mixture into a large bowl and set a mesh strainer over the top of it.

2. Whisk the 5 egg yolks together in medium bowl and set aside. Warm the milk, sugar and salt in a medium saucepan over medium heat until it is very hot to the touch but not boiling. Then slowly pour the warm milk into the egg bowl whisking vigorously and constantly as you do it, then scrape the mixture back into the saucepan. 

3. Stir the mixture constantly over med. heat with a heat proof rubber spatula, making sure to scrape the bottom of the pan as you stir. The custard is done when it coats your spatula and when you run your finger across the back of the spatula the custard does not run together again. If you end up cooking the eggs, you can always run the custard through a blender or food processor before moving on.

4. Place the cocoa bowl in the ice bath. Pour the custard through the strainer into the cocoa mixture and stir to combine. Add the vanilla and stir until the custard is cool to the touch.

5. Cover the bowl with plastic wrap, leaving a slight opening,  and chill the mixture in your refrigerator for at least 8 hours or overnight.

6. Churn according to your ice cream makers instructions. Mix in the nuts and marshmallows by hand at the end (not in your frozen ice cream bowl if that's what you are using). You can then eat it soft or pop it in the freezer until it firms up a little. Prepare to be amazed!